Absurd Minds http://forums.absurdminds.net/ |
|
Valve Hammer Toolbars and Dialogs http://forums.absurdminds.net/viewtopic.php?f=58&t=1049 |
Page 1 of 2 |
Author: | -Tyler- [ 02 Nov 2011 23:34 ] |
Post subject: | Valve Hammer Toolbars and Dialogs |
Dialogs
|
Author: | -Tyler- [ 04 Nov 2011 01:26 ] |
Post subject: | Re: Valve Hammer Toolbars and Dialogs |
Check for Problems Dialog Attachment:
File comment: The Check for Problems Dialog (Below)
Opening this dialog will cause the editor to run through your map and notify you of any errors it finds.alt+p is the shortcut for bringing up the Check for Problems Dialog. check_for_problems.jpg [ 70.25 KiB | Viewed 13539 times ] When you select one of the errors, the entity/solid will be highlighted (if applicable) and three options become available to you. 'Go to error' will center the 2d windows on the selected error object, 'Fix' will fix that error, and 'Fix all (of type)' will fix all errors of the selected type. Some common errors that may occur in your maps... Invalid solid structureThe solid has invalid structure, probably as a result of vertex manipulation. What this means is that the solid is not convex in every plane. You will need to either fix it, or if this is not possible, rebuild it. Entity (entity_name) has unused keyvalues. The entity contains keyvalues (variables) that are not used in its class. You can fix this error with the Fix button. Note that this error will pop up if you are taking advantage of custom compile tools which add keyvalues to entities, but you are not using an FGD file that has these special keyvalues listed. There is no player start.There is no player start in the map. To add one, select the Entity tool, drag the crosshairs to the position you want the player to start at, and press Enter. |
Author: | -Tyler- [ 05 Nov 2011 14:46 ] |
Post subject: | Re: Valve Hammer Toolbars and Dialogs |
Entity Report Dialog Attachment: entity_report.jpg [ 58.56 KiB | Viewed 13536 times ] There are three parts to the Entity Report: The Entites section, the Filer section and then theres four buttons on the right: Mark "Go to" Delete and Properties. The Entites section simply lists all the entites that are currently placed inside your map. You can select one entity by clicking on it, or select multiple entites by holding either shift or control while clicking on the entity. Filer There are three empty bullets directly under the name of this section. You can check "Everything" and all of your entites that have been placed inside your map will be displayed. You can check "Brush Entites" and only Brush-Based Entities will be placed inside your map. Lastly, you can select "Point Based" and only Point-Based Entites will be displayed in the "Entities" section above the Filter section. Theres also a box that says "Include hidden objects" and this will display any hidden entities that you've made. To make hidden entites, look here - placeholder lolcats? Theres also boxes for "By Key Value" and "By Class", and although I've NEVER ONCE used them -outside of learning what the heck they do- I'll explain them anyways. Arn't I sweet? Thanks. Theres not much to say other than they are filter. By u]K[/u]ey Value is basically a way to search entities by their key values that re defined in the properties tab of each entity. By Class is more simple. Basically, if I type in "light", then only "light" entites will be displayed in the Entities list. Hurrah! Now for the four buttons: Mark "Go to" Delete and Properties. Mark lets you, well, mark certain entites which, in other words, should select each entity (ie: marking an entity will have the same effect as clicking on the entity). Go to ceters the 2D and 3D screens on the selected entity(s). If you have more than one entity selected, then the grouping rectangle will be centered in each of the screens. Delete (dick explanation)took me a many a century to learn how to use. Basically, when you select and entity and hit the delete button, the entity magically disappears from your map. (Nice guy explantation) deletes the selected entity(s) from your map. Properties brings up the properties screen for the selected entity(s). In the case that multiple entites are selected, than multiple windows should pop up; one for each entity. Now we should all be masters of the Entity Report Dialog !!! |
Author: | -Tyler- [ 11 Nov 2011 17:37 ] |
Post subject: | Re: Valve Hammer Toolbars and Dialogs |
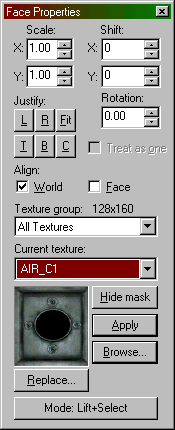
Face Properties Dialog Attachment: face_properties.jpg [ 71.88 KiB | Viewed 13531 times ] "Right-Click" Texture Application A special feature of the Face Properties tool is that of being able to apply the current texture to a brush face by right-clicking on that face. In order to make the textures match up from one face to the next, first align the texture on one of the faces, lift the texture from that face (left-click by default), then Alt-right-click on the other faces one by one. The texture should flow continuously across all the faces. Scale (X/Y) You can modify the scale of a texture to shrink or enlarge it. Numbers less than 1 shrink, and numbers greater than 1 enlarge. You can use negative values to mirror the texture in one or both planes. Shift (X/Y) This simply allows you to shift the texture along the horizontal or vertical texture axes. Rotation Rotation allows you to rotate the texture on a brush face. Justify There are six buttons you can press here: L (left), R (right), Fit (fit to face), T (top), B (bottom), and C (center on face). These allow you to quickly and easily align a texture on a brush. Treat as one If you have multiple faces selected, you can check this option to treat all the faces as one single face. Align: World and Face These checkboxes allow you to set the texture alignment style for the selected faces. World alignment causes textures to be aligned according to world coordinates (if you're familiar with versions of the editor before 3.3, this was the standard behavior). Face alignment uses the coordinates of the face as a basis for alignment. Texture Group You can select which group of textures you want to use - either all of them, or individual texture WADs. Current Texture The name of the current texture is displayed here, along with a thumbnail picture of the texture. Hide Mask If this button is toggled on, the selected brush face(s) will not appear as selected (with a reddish hue). This may make it easier to perform some texture manipulations. ModeThis lets you select what will happen when you click on a brush face with the left mouse button. The available options are Lift+Select, Lift, Select, Apply (texture only), Apply (texture + values), and Align to View. Lift+Select - Clicking on a brush face in the 3D view will select that face and make it's texture the current texture. Lift - Clicking on a brush face will make it's texture the current texture without selecting the face. Select - Clicking on a brush face will select that face without changing the current texture. Apply (texture only) - Clicking on a brush face will apply the current texture to that face without changing any of it's other properties. Apply (texture + values) - Clicking on a brush face will apply the current texture and texture properties. Align to View - This is like projecting a texture from the camera face, as if you were a slide projector and the texture is a slide. It's useful for painting a texture onto a cliff or other irregular things. |
Author: | -Tyler- [ 11 Nov 2011 17:39 ] |
Post subject: | Re: Valve Hammer Toolbars and Dialogs |
Go to Brush Dialog Attachment: go_to_brush.jpg [ 36.82 KiB | Viewed 13531 times ] Entity 0, Brush 4, Side 8: has a coplanar plane at (304, -384, 0), texture GENERIC99 To find the invalid brush in your map, you'd just bring up the Go To Brush dialog (by pressing Ctrl+Shift+G) and enter 0 as the entity number and 4 as the brush number, then press OK. The invalid brush will become selected and centered in the 2D views. Note: if you've compiled or exported your map with the "visible objects only" setting enabled, you should enable the "Search visible brushes only" setting here as well. |
Author: | -Tyler- [ 11 Nov 2011 17:41 ] |
Post subject: | Re: Valve Hammer Toolbars and Dialogs |
Hollow Dialog Attachment: hollow.jpg [ 45.83 KiB | Viewed 13531 times ] The hollow function allows you to take a block and hollow it. To hollow outward (ie: to make the block the inside area of the hollow cube), use a negative number for the wall thickness. |
Author: | -Tyler- [ 11 Nov 2011 17:44 ] |
Post subject: | Re: Valve Hammer Toolbars and Dialogs |
Map Information Dialog Attachment: map_information.jpg [ 57.84 KiB | Viewed 13531 times ] Number of : -Solids -Faces -Point Entities -Solid Entities -Unique Textures ; meaning HINT, SKIP, NULL, ect... -Texture Memory ; how much memory (MBs) your textures are using WADs used: A list of the current WADs your using, and the path to them. |
Author: | -Tyler- [ 13 Nov 2011 18:33 ] |
Post subject: | Re: Valve Hammer Toolbars and Dialogs |
Object Properties Dialog There are two "modes" to the object properties dialog. One is with SmartEdit turned ON, the other is with SmartEdit turned OFF. Below: Example of a light entity's object properties with the SmartEdit first turned on, then turned off. Attachment: object_properties_one.jpg [ 65.5 KiB | Viewed 13527 times ] Attachment: object_properties_two.jpg [ 61.24 KiB | Viewed 13527 times ] When it's turned on, all of the entity's key (entity) variables and their desciptions are shown to you. If you are already familiar with the entity properties, you may find it more convinient to turn this mode off and manually insert the keyvalues. SMARTEDIT IS ONLY AVAILABLE FOR ENTITES! Alright, lets talk about angle control. The Angle control is made up of two parts. A.) The Angle text box and B.) The Angle Compass. These two allow you to accomplish the same thing: set an angle between 0 and 359. The and text box also allows you to chooes "up" and "down" wgucg correspond to angles "-1" and "-2". Browsing- Some Entities properties(those that require a path/filename of a sprite/sound/model) will have a small button beside their property that, when clicked on, will allow you to browse through the appropriate game directory for the sprite, sound, or model. This behavior is controlled by the game data file. For more information on that particular subject, see FGD Format Changes. Flags Inside this tab, you will discover a list of all the available flags for an entity. This section is also only available when editing and ENTITY'S properties. A flag allows you to toggle on or off specific features off an entity. VisGroup This section allows you to assign the selected object to a VisGroup, or remove it from one. You can also bring up the Object Groups dialog from here. For more information, see Grouping and VisGrouping. |
Author: | -Tyler- [ 24 Nov 2011 16:20 ] |
Post subject: | Re: Valve Hammer Toolbars and Dialogs |
Prefab Factory Dialog Attachment: prefab_factory.jpg [ 98.4 KiB | Viewed 13507 times ] Select a Library This allows you to select the library you want to work on at the moment. The three buttons to the right work directly on the selected library. Add Library creates a new empty library. Remove deletes the library from your hard drive. Edit allows you to edit the name and description of the library. The description of the currently selected library is displayed under the library selection box. Note: Prefab libraries are stored in your Valve Hammer Editor "prefabs" directory. You can manually add and delete them by adding or removing prefab files (.OL files) in this directory. Objects in library This displays the objects available in the currently selected library and allows you to work on them using the four buttons to the right. Add object brings up a browse box and lets you pick from .MAP and .RMF files to add to the library as prefab objects. Remove deletes the selected object from the library. Edit allows you to edit the name, description and the map data of the currently selected object. Export object will let you export the currently selected object as a .MAP file. When you select an object, its description, if any, will be displayed in the Object Notes section. |
Author: | -Tyler- [ 24 Nov 2011 16:22 ] |
Post subject: | Re: Valve Hammer Toolbars and Dialogs |
Replace Textures Dialog Attachment: replace_textures.jpg [ 81.78 KiB | Viewed 13507 times ] These text boxes and texture pictures show the texture to be found in the map, and the new, replacement texture. You can browse through the entire texture library to choose the "find" texture, the "replace" texture, or both. Replace In The Replace In section lets you specify what should and shouldn't get replaced. You can replace everything, or only marked objects, and you can choose to include or exclude hidden objects. Action This lets you choose which search-and-replace method you would like to use... Replace exact matches Replace partial matches Substitute partial matches - when this is enabled, you can search for a specific part of an entity name, and substitute that part with something else. For example, if you have a bunch of slime textures, ("slimedoor", "slimefloor", etc) and you want to change them to "rustdoor", "rustfloor", etc, you can enable this, search for "slime" and replace with "rust". Do not replace textures (mark solids found) Use this feature to simply mark (select) faces containing the given texture, instead of replacing them with another texture. This is extremely useful if you would like to modify the texture attributes of every texture of a certain type, but don't want to select each one manually (while you are in the Face Properties dialog). |
Author: | -Tyler- [ 24 Nov 2011 16:24 ] |
Post subject: | Re: Valve Hammer Toolbars and Dialogs |
Transform Dialog Attachment: transform.jpg [ 42.07 KiB | Viewed 13507 times ] The Transform dialog gives you precise control over a selected object. You have the option to rotate, scale, or move the selected object in any of the x, y, or z planes. Values entered are in units, except in the case of rotation, where degrees are used. |
Author: | -Tyler- [ 08 Dec 2011 03:11 ] |
Post subject: | Re: Valve Hammer Toolbars and Dialogs |
Filter Control Toolbar Attachment: filer_control.jpg [ 35.66 KiB | Viewed 13485 times ] All VisGroups will be listed in this control toolbar. VisGrouping is a powerful tool for limiting visible objects in the map. This allows for much easier editing on large levels but does required that you use the .RMF file type for saving your maps since the .MAP format doesn't include the VisGroup information. VisGroups are created using the Hide Selected and Hide Unselected buttons on the Map Operations toolbar. When a VisGroup is created, it is inserted into the Filter Control dialog with a name of "n objects", where n is the number of objects in the VisGroup. The name can be changed by clicking on the group, then clicking on it again (but not double-clicking!). There are a number of buttons that can be used in the Filter Control dialog: Apply - Will cause unselected VisGroups to become invisible in the 2D and 3D views. Select a group by clicking just to the left of its name. A small hand will appear. Edit - This allows you to edit the name and color of a VisGroup, as well as add and remove new groups. Mark - This causes selected VisGroups to be highlighted in the 2D and 3D views. Purge - This will remove any groups from the VisGroup window that no longer contain any objects. Note: You can delete a VisGroup from the list by dragging it out of the filter control dialog window. Another feature of the Filter Control window is the ability to merge two VisGroups. This is done by dragging one group on top of a second. Hammer will ask if you want to combine the two groups, and if you do, they will be merged and the first group will take on the VisGroup properties (name, color) of the second group. |
Author: | -Tyler- [ 08 Dec 2011 03:17 ] |
Post subject: | Re: Valve Hammer Toolbars and Dialogs |
Map Operations Toolbarpart 1: Align to World/Align to Face, Carve ,Cut/Copy/Paste Align To World/ Align To Face Attachment: align_to_world_face.jpg [ 12.37 KiB | Viewed 13485 times ] Carve Attachment: carve.jpg [ 11.97 KiB | Viewed 13485 times ] Cut/Copy/Paste Attachment: cut_copy_paste.jpg [ 14.77 KiB | Viewed 13485 times ] Cut removes an object and copies it. Copy copies and object. Paste produces another copy of the copied object on screen, or cut object for that matter. |
Author: | -Tyler- [ 08 Dec 2011 03:22 ] |
Post subject: | Re: Valve Hammer Toolbars and Dialogs |
Map Operations Toolbar part 2: Group/Ungroup Hide Selected/Unselected/Show All, Ignore Groups. Group/Ungroup Attachment: group_ungroup.jpg [ 14.52 KiB | Viewed 13485 times ] Hide Selected/Unselected/Show All Attachment: hide_selected_unseleced_showall.jpg [ 14.33 KiB | Viewed 13485 times ] Ignore Groups Attachment: ignore_groups.jpg [ 8.84 KiB | Viewed 13485 times ] |
Author: | -Tyler- [ 08 Dec 2011 03:29 ] |
Post subject: | Re: Valve Hammer Toolbars and Dialogs |
Map Operations Toolbar part 3: Map Operations, Run Map, Texture Lock Map Operations Attachment: Map_operations.jpg [ 41.18 KiB | Viewed 13485 times ] Run Map Attachment: run_map.jpg [ 11.92 KiB | Viewed 13485 times ] here Texture Lock Attachment: texture_lock.jpg [ 15 KiB | Viewed 13485 times ] |
Author: | serialp0rt [ 16 Feb 2012 12:21 ] |
Post subject: | Re: Valve Hammer Toolbars and Dialogs |
Man you put a shit load of work into these posts. Enabled and good job |
Author: | -Tyler- [ 08 Mar 2012 22:09 ] |
Post subject: | Re: Valve Hammer Toolbars and Dialogs |
@Serial: not quite done yet. Unfortunately Ive been unable to do anything really since October. Anyways, Toggle Auto Selection Attachment: toggle_auto_selection.jpg [ 18.09 KiB | Viewed 13368 times ] When Toggle Auto-selection is toggled on, you can select multiple objects by simply clicking your mouse button and dragging a selection box around the objects. When this option is toggled off, you can also select multiple objects by dragging a selection box around the objects and then pressing Enter. There is really nothing else special about this function. Toggle Select by Handles Attachment: toggle_select_by_handles.jpg [ 15.4 KiB | Viewed 13368 times ] Toggle Cordon State/Edit Cordon Bounds Attachment: toggle_edit_cordon_bounds_state.jpg [ 20.58 KiB | Viewed 13368 times ] This is extremely useful when you are working on a large level and want to look at changes made in only a small area. Rather than wait a considerable amount of time for the entire map to compile, you can selectively compile only a small area by using the Cordon functions. Note: Be sure to place a temporary player start within the bounds of the cordoned area before you test compile that section. |
Author: | -Tyler- [ 08 Mar 2012 22:18 ] |
Post subject: | Re: Valve Hammer Toolbars and Dialogs |
Map View Toolbar Attachment: map_view_toolbar.jpg [ 31.32 KiB | Viewed 13367 times ] Toggle Grid, Toggle 3D Grid Attachment: toggle_grid_3d_grid.jpg [ 16.4 KiB | Viewed 13367 times ] Smaller/Larger Grid Size Attachment: smaller_larger_grid.jpg [ 19.39 KiB | Viewed 13367 times ] Load/Save Window State (image in the next post as Ive hit the limit of three on this one...) These buttons are used to save and restore window configurations when the independent window configuration is being used. Independent window usage can be enabled or disabled in the "General Options" dialog. |
Author: | -Tyler- [ 08 Mar 2012 22:21 ] |
Post subject: | Re: Valve Hammer Toolbars and Dialogs |
As promised, here is the image of the buttons for Load/Save Window State (description above in the previous post). Attachment: load_save_window_state.jpg [ 20.59 KiB | Viewed 13367 times ] |
Author: | -Tyler- [ 08 Mar 2012 22:34 ] |
Post subject: | Re: Valve Hammer Toolbars and Dialogs |
New Objects Toolbar (I think its more of a dialog, but the "official" title is a toolbar, but w.e) Attachment: new_objects_toolbar.jpg [ 50.77 KiB | Viewed 13367 times ] toWorld (Ctrl-T) - toWorld will remove any entity settings of the selected solid or group of solids. toEntity (Ctrl-W) - This will attach the currently selected solid or group of solids to an entity. Categories - When the Entity Tool is active, no categories are available. With Block Tool selected, there will be at least one category available: the "Primitives", which contain the editor's five basic solid shapes: block, cylinder, spike, wedge, and the arch tool. If any Prefab libraries have been defined, then the library names will also be listed here. Object - This list contains all objects that belong to the chosen category. For entities, the list contains all entity classes available. For solids, if the 'Primitives' category has been selected, then this list contains the five types of primitives. If a Prefab library has been selected, then this list contains all objects in the library. Faces - This text box becomes active if the Block Tool is active, and either 'cylinder' or 'spike' is the current solid type. The value (which can be changed by either the keyboard or clicking the LEFT MOUSE BUTTON on the little arrows) represents the number of side faces the cylinder/spike will be created with. Create Prefab (Ctrl-R) - This will let you turn a selected object into a prefab object which will be easily reusable. When you press this button, a Create Prefab dialog will pop up. Here you can enter the name and description of the prefab, as well as choose which library it will be placed in. |
Page 1 of 2 | All times are UTC-04:00 |
Powered by phpBB® Forum Software © phpBB Limited https://www.phpbb.com/ |